
HYPERTUFA POTS
Milk-Carton Hypertufas
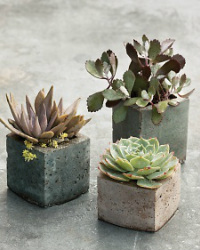
Milk cartons used as molds create cube-shaped hypertufa vessels, each
sized for a single succulent. The tint variations are achieved by mixing in
masonry stains.
To make a pot, you'll need to fashion a mold from a pair of vessels. The mixture is poured between them. I experimented with various objects, such as milk cartons and metal bowls, and also constructed wooden molds. Because the medium captures subtle textures, baskets and leaves can be rendered in "stone," while clean-lined molds offer a sleek, modern look. It is not an exact science, which is part of the fun. Every pot has the potential to surprise.
1. Choose mold: Make a mold from two nested vessels, so you can pour
the mixture in the space between them. Both should have sides that are straight
or taper out; the gap between them should be at least 3/4 inch for smaller
vessels and 1 1/2 inches for larger ones.
2. Mix materials: Wearing gloves and a dust mask, mix equal parts
white Portland cement (gray can be substituted for nontinted vessels), perlite,
and peat moss in a large bin; stir in masonry stain if desired. Add water
gradually to reach the desired consistency.
3. Fill mold: Coat vessels with mold-release spray. Pour mixture into
the outer mold to a 1-inch depth for smaller vessels or a 2-inch depth for
larger ones. Set interior mold inside, centering it (you can fill it with sand
to steady it). Continue adding mixture between vessels. Tap exterior with a
rubber mallet to minimize bubbles. Cover with plastic; let set.
4. Let set for 24 hours, then gently remove interior container. After
another 24 hours, tear away carton. After removing mold, drill holes into the
bottom of pot using a masonry bit, for drainage; smooth the top edge of pot with
a planer file. Wrap it with plastic and let cure for several
weeks.
